Friday 16 March 2012

Deploy sharepoint webpart to bin


  Simply put, I had three web parts that I wanted to package up as features into a .wsp so I could run stsadm to deploy them to different environments, such as q/a and production. I followed the following two steps:
  1. First, I used WSPBuilder to create my wsp, packaging the web parts into features. I also indicated at this point that I wanted it to be a bin deployment.
  2. Once the web part assembly dll was deployed to bin, I made the required CAS policy changes, otherwise the web parts wouldn't run. This involved a policy file and the web.config.

So, as far as step 1 goes, there are few things that will need to be done:
  1. Create an 80\bin\ folder in your solution explorer.
  2. Change your project's Build Output Path to that new folder.
  3. Change AssemblyInfo.vb to import System.Security and also to AllowPartiallyTrustedCallers.
  4. Create a mirror folder structure to the 12 hive in Solution Explorer: 12/Template/Features with a folder below that for each web part/feature to be deployed. Ensure each web part/feature folder has a feature.xml, elements.xml, and .webpart.
  5. Download WSPBuilder and install it. It will be added to the Tools menu. Click Tools -> WSPBuilder - Build WSP. The manifest.xml will be autogenerated and added to the .wsp along with the assembly's dll, and the web parts' feature.xml, elements.xml, and .webpart files.
  6. Run stsadm on the resulting .wsp to add solution, deploy solution, then activate the features.

Finally, step 2 involves setting the proper CAS permissions:
  1. Make a copy of wss_minimaltrust.config (in 12/CONFIG on server) and edit this copy as it will be the required custom policy file we need.
  2. Add a reference to SharePointPermission in the <SecurityClasses> section.
  3. Add a new custom permission set that lists the required permissions. Copy and paste the permission set SPRestricted, and in the new copy, add a line for SharePointPermission.
  4. Next, add a code group that links the newly created permission set with your assembly, so SharePoint knows when to apply the permissions.
  5. Finally, hop over to your web.config and make sure its using custom trust level, and that custom trust level is pointing to your new policy file.
If you want a step-by-step with code to copy/paste, you can find it here at How to deploy a SharePoint web part to bin. You will also find links to other pages that also show how to do this.

Wednesday 14 March 2012

Create a SPlist and its SPView in SharePoint writing C# code against WSS object model


Create a SPlist and its SPView in SharePoint writing C# code against WSS object model

How to create a SPlist and its SPView in SharePoint writing C# code against the WSS object model ?

Assume you want to create the list and its view when activating a SharePoint Feature.
        public class myFeatureReceiver : Microsoft.SharePoint.SPFeatureReceiver
        {
            public override void FeatureActivated(SPFeatureReceiverProperties properties)
            {
                using (SPWeb web = properties.Feature.Parent as SPWeb)
                {
                    System.Diagnostics.Debug.WriteLine("Creating the list");
                    //web.AllowUnsafeUpdates = true; //use this in an application page no need in a dll
                    web.Lists.Add("Customers""Store informations about my Company Customers",SPListTemplateType.GenericList);
                    web.Update();

                    System.Diagnostics.Debug.WriteLine("Creating the Fields");
                    SPList myNewList = web.Lists["Customers"];
                    myNewList.Fields.Add("First Name"SPFieldType.Text, false);
                    myNewList.Fields.Add("Last Name"SPFieldType.Text, false);
                    myNewList.Fields.Add("Adress"SPFieldType.Text, false);
                    myNewList.Fields.Add("City"SPFieldType.Text, false);
                    myNewList.Fields.Add("Latest Purchase Date"SPFieldType.DateTime, false);
                    myNewList.Fields.Add("Sales Comments"SPFieldType.Note, false);
                    myNewList.Update();

                    System.Diagnostics.Debug.WriteLine("Creating the view");
                    System.Collections.Specialized.StringCollection strColl = newSystem.Collections.Specialized.StringCollection();
                    strColl.Add("Title");
                    strColl.Add("First Name");
                    strColl.Add("Last Name");
                    strColl.Add("Adress");
                    strColl.Add("City");
                    strColl.Add("Latest Purchase Date");
                    strColl.Add("Sales Comments");
                    myNewList.Views.Add("Summary", strColl, @"", 100, truetrue, Microsoft.SharePoint.SPViewCollection.SPViewType.Html, false);
                    myNewList.Update();
                }
            }
        }


References

SPViewCollection.Add Method (MSDN - Microsoft.SharePoint)

Views.AddView Method (MSDN - Views Web Services) 

What are Content Type


What is a Content Type then?
A content type is an object that is stored within MOSS that defines several elements of a piece of content, including:

  • Document Template that the content will be based on
  • Columns that the content will have associated with it (metadata)
  • Workflows that the content will use
  • Information Management policies that apply to the content
  • Conversion types for the content
This picture shows the site-wide admin interface for managing content types

Every piece of list or library content in MOSS is created from a content type. There are a load of out-of-the-box content types like ‘Blank Document’ or ‘Announcement’ and you can create your own (without any code or customisation, it is done through the admin UI).
So how do you apply them?
Content Types are created centrally and then they can be applied to lists and libraries throughout your site.

This picture shows the list-based interface for adding content types to a list or library

What does this mean for users?
This means that users can now create an expense report by simply choosing ‘expense report’ from the new item button on the library. Their new expense report will be created from the central content type with the document template and all the columns and workflow that are associated with the content type.

This pictures show the net result of content types; the ability for users to choose what type of content they wish to create
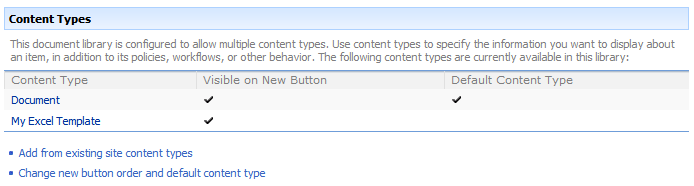
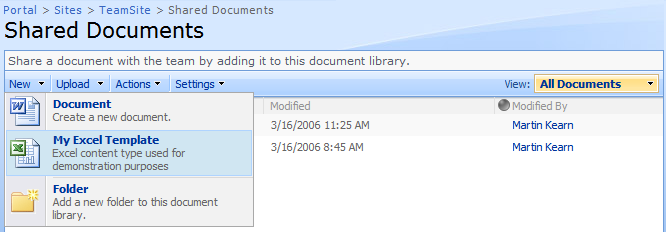
The important thing to note here is that the content will inherit all of the columns and workflow that comes with the content type – even if the library does not.
For example, if you have a standard document library that just has the ‘blank document’ content type associated with it (which is the default) it will not have any columns or workflows. However if you add the ‘expense report’ content type to the library, items created from that content type will have all of the columns and workflows that are required by the content type. These columns can be used in the same way as list-based columns.
Why should you get excited?
The easiest way to demonstrate this is to compare SharePoint Server 2007 against SharePoint Portal Server 2003 functionality.
Document Templates:
  • In 2003 you needed some third party or community supported code to use anything more than the single template that is defined for each library
  • In 2007 you can choose to include multiple content types (each with their own template) within a library using simple configuration

Metadata (Columns):
  • In 2003, all items in a library have to use the same metadata columns. This restricts your library design to specific types of content rather than administrative or logical libraries structures
  • In 2007, the content in a library can be whatever type you like without compromising the metadata of that content because each content type brings it’s own set of columns

Workflow:
  • OK, so 2003 did not have workflow. But it did have Document Library Event Handlers which were used for workflow. Again these event handlers applied to the entire content of a library, not specific documents
  • In 2007, the content brings the workflow that it needs with it, regardless of where it is stored. Work flows are included as part of the contenyt type, not the library (allthough they can also be set on thr library)

Search:
  • In 2003, there was no easy way of differentiating different types of content other than relying on column values being filled out
  • In 2007, you can search on ‘where content type = x’, i.e. ‘give me all the expense reports written by Jo Blogs’

This was only a brief summary, I hope it was useful. Please comment if you need clarification, found it usefull, good but do this different etc ….

Tuesday 13 March 2012

Reinstall microsft diagnostics services

Go to Start -> All program -> Microsoft Office ->Microsoft Office Tools -> Microsoft Office Diagnostics ->
Click on continue and follow the steps.

Getting Names and Email Addresses from Active Directory Groups


1: public static StringDictionary GetGroupMembers(string GroupName, string UserName, string Password)
   2: {
   3:     try
   4:     {
   5:         StringDictionary ReturnArray = new StringDictionary();
   6:         DirectoryEntry deDirEntry = new DirectoryEntry("LDAP://LDAPDOMAIN",
   7:                                                            UserName,
   8:                                                            Password,
   9:                                                            AuthenticationTypes.Secure); 
  10:  
  11:         DirectorySearcher mySearcher = new DirectorySearcher(deDirEntry);
  12:         mySearcher.PropertiesToLoad.Add("distinguishedName"); 
  13:  
  14:         string sFilter = String.Format("(&(objectcategory=group)(cn=" + GroupName + "))"); 
  15:  
  16:         mySearcher.Filter = sFilter;
  17:         mySearcher.Sort.Direction = SortDirection.Ascending;
  18:         mySearcher.Sort.PropertyName = "cn"; 
  19:  
  20:         SearchResult result;
  21:         DirectoryEntry ResultEntry; 
  22:  
  23:         result = mySearcher.FindOne();
  24:         ResultEntry =result.GetDirectoryEntry(); 
  25:  
  26:         GroupName=ResultEntry.Properties["distinguishedName"].Value.ToString(); 
  27:  
  28:         mySearcher = new DirectorySearcher(deDirEntry);
  29:         mySearcher.PropertiesToLoad.Add("cn");
  30:         mySearcher.PropertiesToLoad.Add("mail"); 
  31:  
  32:         sFilter=String.Format("(&(memberOf={0}))", GroupName);
  33:         mySearcher.Filter = sFilter;
  34:         mySearcher.Sort.Direction = SortDirection.Ascending;
  35:         mySearcher.Sort.PropertyName = "cn";
  36:         mySearcher.PageSize = 1000; 
  37:  
  38:         SearchResultCollection results;
  39:         results = mySearcher.FindAll(); 
  40:  
  41:         foreach (SearchResult resEnt in results)
  42:         { 
  43:  
  44:             ResultPropertyCollection propcoll = resEnt.Properties;
  45:             string Name="";
  46:             string Email="";
  47:             foreach (string key in propcoll.PropertyNames)
  48:             {
  49:                 if (key == "cn")
  50:                 {
  51:                     foreach (object values in propcoll[key])
  52:                     {
  53:                         Name=values.ToString();
  54:                     }
  55:                 }
  56:                 else if(key=="mail")
  57:                 {
  58:                     foreach (object values in propcoll[key])
  59:                     {
  60:                         Email=values.ToString();
  61:                     }
  62:                 }
  63:             }
  64:             ReturnArray.Add(Name,Email);
  65:         }
  66:         return ReturnArray;
  67:     }
  68:     catch
  69:     {
  70:         return null;
  71:     }
  72: }

Sharepoint dll location

Physical location of Sharepoint dll is :


C:\Program Files\Common Files\Microsoft Shared\web server extensions\12\ISAPI

Enjoy..............

Site Defination and its component


Site Definitions in SharePoint 2007

For one of our clients we need to build custom site definitions. When building SharePoint solutions the terms site template, definition and to a lesser extent site portal are often used. Each of these allows the user to create a new site with a predefined set of Content Types, Layouts, and Lists etc. In the case of the Portal, it allows the user to create a site and one or more nested child sites.
Site definitions are our preferred way to develop custom sites. A portal definition is a variation of the Site Definition except that the definition describes a series of sites to be created. An example of this is the Site Collection Publishing Template, which creates a root site collection, a News sub site, a Documents sub site and some others.
The focus of this article is on how site definitions and Portal definitions can be created and deployed. Site definitions are usually deployed as a part of a solution package, which is a compressed cabinet file made up of XML files and other resources. Solution packages are first added and then deployed to the MOSS farm. Once deployed the contents of the solution can be made available to sites, or used to create new sites.
The Solution Package can also deploy Site Features. A Site Feature can do myriad things, such as deploying a new web part, defining a new content type, site column, list type, adding a new page layout, or even a graphic image. Site Features can then be activated in a site, or automatically applied in a new site definition. We typically deploy several features as part of the new site definition, as this allows multiple developers to work together without interfering with one another. The solution and feature methodology is a powerful new model for MOSS and is used by Microsoft to build and extend MOSS.


CREATING A SITE DEFINITIONTo create a site definition the first step is to create the “WebTemp” file. The purpose of the webtemp file is to describe to SharePoint the new Site Definition or Site Portal Definition. After the WebTemp file, the Site Definition file should be created, this is known as the ONET.XML file. Each Site Definition contains one or more configurations of lists and features. A site Definition can also point to a Portal Definition. The portal definition uses one or more site definitions. The relationship of files is shown below:


WEBTEMP FILE
All the webtemp files are XML files which live in the <12-hive>\TEMPLATES\1033\XML. The webtemp file can be thought of as Meta data or a description of a Site Definition. For example, the file contains the name of the site definition, as displayed in the Create Site page in a site or the Create Site Collection page in Central Administration.
Each Site Definition description is in a <Template> node that contains one or more configuration nodes. The name assigned to a Template must match the name of a directory in the <12-hive>\TEMPLATE\SiteTemplates directory. SharePoint then looks for the ONET.XML file in a subdirectory called XML to find the actual Site Definition. The ID of the Template must be unique across the SharePoint installation. The following is a sample template definition:

<Template Name="SPPR" ID="10856">

    <Configuration ID="0"

         Title="Syrinx Root"
         Description="This site is intended to be the root site collection for a Syrinx portal."
         Hidden="TRUE"
         ImageUrl="/_layouts/images/stsprev.png"
         DisplayCategory="Syrinx"
         RootWebOnly="True"/>
</Template>

The Configuration declaration can define if the site definition can be used for a site root collection only, a sub web site only or both. This provides a level control on how the site definition can be used, and provides a mechanism to control how certain features are enabled.
In the case of a Portal definition, the webtemp template configuration adds some additional attributes:

<Template Name="SyrinxPortal" ID="10855">

    <Configuration ID="0"

        Title="Syrinx Portal Site"
        Type="0"
        Hidden="FALSE"        ImageUrl="/_layouts/1033/images/template_corp_intranet.png"
        Description="This site is the definition of the Syrinx Portal collection."
        ProvisionAssembly="Microsoft.SharePoint.Publishing, Version=12.0.0.0, Culture=neutral, PublicKeyToken=71e9bce111e9429c"
       ProvisionClass="Microsoft.SharePoint.Publishing.PortalProvisioningProvider"
        ProvisionData="SiteTemplates\\WebManifest\\PortalWebManifest.xml"
        RootWebOnly="TRUE"
        DisplayCategory="Syrinx"/></Template>


The attributes of interest are the ProvisionAssembly, ProvisionClass and ProvisionData. When creating a Portal site the class specified by the ProvisionClass attribute is called in the assembly specified by the ProvisionAssembly. The class is passed the value of the ProvisionData attribute as a parameter. Microsoft provides an implementation of a Provisioning Class. The Microsoft Provisioning Class (MPC) is used to create a Portal Site.
The MPC expects the ProvisionData value to be the path to an XML file, which contains instructions on the sites to create as part of the Portal Definition. This methodology is used to create the Publishing Site, which creates several sub sites. By looking in the PortalWebManifest.xml file specified above, it can be seen that four sites are created, News, Site Directory, Search Center, and Document center. Below is a sample Syrinx Portal Provisioning Data XML file.
  <portal xmlns="PortalTemplate.xsd">
    <web name="Syrinx Root"
         siteDefinition="SPPR#0"
         displayName="Syrinx Portal Display Name"
         description="Syrinx Watch Portal Description">
      <webs>
        <web name="NorthEast"
             siteDefinition="SPRegion#0"
             displayName="North East"
             description="North East Site Description">
          <webs>
            <web name="Massachusetts"
                 siteDefinition="SPState#0"
                 displayName="Massachusetts"
                 description="Massachusetts Site Description"/>
          </webs>
        </web>
        <web name="SouthEast"
             siteDefinition="SPRegion#0"
             displayName="South West"
             description="South West Site Description"/>
      </webs>
    </web>
  </portal>
This file declares the top-level site that is to be created, and it uses the SPPR#0 site definition. This is a reference back into the webtemp files; it is referencing a site definition template called “SPPR” and from that definition use configuration “0”, the display name and description of the root level site are overwritten by the values entered by the user when the site is created.  Nested below this site, are two child sites that use configuration 0 from the SPRegion site definition, the North East and South East regional sites. Below the North East regional site is a sub site called Massachusetts, which uses configuration 0 from the SPState site definition.

ONET.XML FILEThe onet.xml file contains the actual site definition and is broken in to several sections, navigational areas, list templates, document templates, configurations, modules, components, and server e-mail footer. The MSDN documentation provides an good reference on the structure and contents of an onet.xml file (seehttp://msdn2.microsoft.com/en-us/library/ms474369.aspx). The best way to create a new onet.xml file is to copy one from the site templates directory which is close to what you need and then modify it to suit your needs. Below is an overview of the sections within the onet.xml file.

Click here for more details


Pages

Followers